 Even the most ardent defender of processed foods would have to admit that for all the reasons we eat food, whole grain flours are vastly superior to refined white flour: whole grain flour contains more protein, vitamins, minerals and fiber than refined white flour, is lower on the glycemic index, and avoids the bleach and other chemicals used in the refining process. Did you know that a cup of whole wheat flour, from say, 2 large pieces of pizza, contains 25% of your daily iron requirements? Or more than half of your daily fiber? Did you know that whole wheat flour has the highest amount of insoluble fiber of any food we eat, and works to aid digestion, prevent gastrointestinal disease and colon cancer? Did you also know that breads made from whole grain flour are delicious? That they actually taste like the plant from which they came: nutty, sweet, bitter, floral, grassy, earthy; there is a whole range of flavors found in whole grain flours that refined white flour can’t hope to capture.
So if whole grain flours are so great, why are we still using white flour? One word: convenience. The holy grail of modern cookery, refined white flour is more convenient to use: it stores longer on the shelf, without becoming rancid; it grinds finer and more evenly for more consistent performance in baked goods; removal of the bran makes the flour light and fluffy, resulting in smoother and more consistent bread dough and faster & higher rise upon baking. And I will admit, after years of cooking nearly exclusively with whole grain flours, when I use white flour for some reason (usually at a friend’s house) it behaves like a dream: biscuits rise higher, pie crust rolls easier, bread dough requires less kneading time and is smooth as a baby’s bottom. There’s just one problem: it doesn’t taste like anything.
In our rush to save another 5 minutes of time in the kitchen, we forgot a fundamental law: gains in one area (convenience, stability, reproducibility) are always offset by losses in another (nutrition, variety, taste). White flour by itself doesn’t really taste like anything; which is why we slather our rolls with butter and our toast with jam. And hey: I’m all for rolls slathered in butter and toast with jam. But whole grain breads are practically bursting with flavor and texture, even plain, that you simply can’t achieve with white flour. So is it worth a few extra minutes in the kitchen and a bit of practice in working with whole grain flours to gain whole new worlds of flavor and texture? I think so.
The following is my recipe for basic pizza dough: I generally use a mix of whole wheat bread flour (hard red wheat) and whole white wheat flour (soft white wheat), although at times I mix it up with other flours for variety. There are a few things to know about working with whole wheat flour: 1) it doesn’t hydrate the same as refined white flour, so if you are adapting a recipe based upon white flour (as almost all recipes are) you will nearly always need to adjust the amount of liquid (either up or down) in order to achieve the desired result; this will take a bit of intuition and practice on your part, but is second nature once you get the hang of it; 2) bran in whole grain flours tends to be sharp and ‘cut’ strands of gluten, the protein framework that gives breads their loft and structure; this means that whole grain breads can be tougher to knead, require more resting time and should not be allowed to rise as much as a white flour dough in order to achieve a light, airy texture in the baked bread; 3) baked goods made with whole wheat flour gain flavor and complexity over time, so if you can plan ahead and give whole grain dough more time – time to sit, ferment, proof, rest, rise, etc. – you will reap gains in flavor, texture and performance. That said, when I’m in a hurry, this dough goes from bowl to oven in just about an hour, only a few minutes longer than it would take with white flour, but a world of difference in taste and enjoyment. Give whole grain flour a try: you may just fall in love.
 Adapted from Basic Pizza Dough in Pizza by James McNair
Whole Grain Pizza Dough
INGREDIENTS
- 3 cups (14 oz) whole grain flour (I use 2 cups whole wheat bread flour + 1 cup whole white wheat)
- scant 1 tbsp instant or active dry yeast
- 1 and ¼ cups (10 oz) warm water (110 – 115 degrees F)
- 1 tsp sea salt
- 3 tbsp (1 oz) olive oil
- dollop of honey (optional)
METHODS
- Proof yeast. For active dry yeast, proof the yeast first by stirring with warm water & honey. Let stand for 5-10 minutes, until foam and small bubbles start to form on the surface of the yeast mixture. For instant yeast, simply add yeast directly to the flour.

- Form dough and fold. In a large bowl, combine flours, yeast, water, salt, olive oil and honey, if using. Stir vigorously with a wooden spoon or spatula until a loose wet dough is formed. Add water or flour here as needed to form a cohesive, but very sticky, ball of dough. Let rest in bowl for 5 minutes. Turn the dough out onto a lightly floured workspace. Pat the dough out into a rectangle. With floured hands and a bench scraper, fold the dough into thirds, like a business letter, then fold up the top and bottom, until the dough is roughly in the shape of a square ‘ball.’ Cover with a clean kitchen towel and allow to rest for 15 minutes. Prepare an oiled bowl for rising the dough.
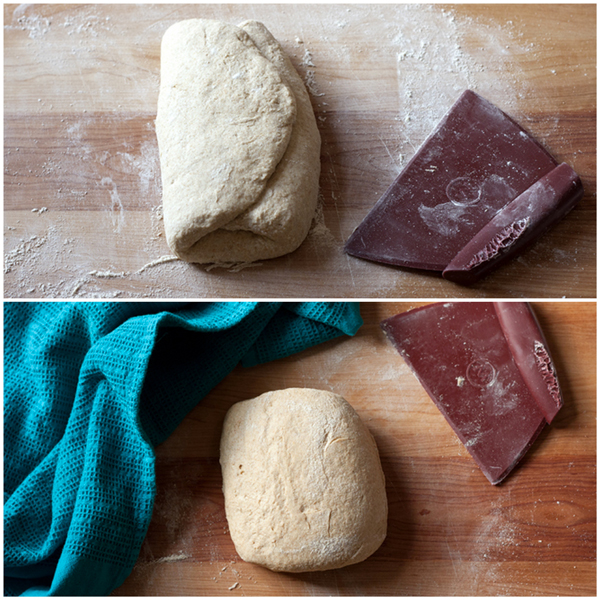
- Knead and rise. Place a small bowl of water nearby to wet your hands. Knead the dough, alternately flouring and wetting your hands, using the heel of your hands to push out and away from you, until the dough feels smooth and springy, like an elastic, but is still somewhat sticky, about 5 – 10 minutes. Resist adding too much flour: use a combination of water and flour on your hands to keep dough from sticking. If dough starts to resist you, allow to rest for 5 minutes then resume kneading. Form into a ball, transfer to the oiled bowl, turn once to coat the whole ball in olive oil, then cover tightly with plastic wrap and leave in a warm spot to rise. Allow to rise until dough has increased 50% in bulk, about 45 minutes. If time allows, punch down the dough, form again into a ball, replace the plastic wrap and transfer the bowl to the stovetop. The second rise should take about half the time of the first, or about 25 minutes. If not, skip ahead and use the dough after only a single rise.

- Preheat the oven as hot as it will go (550 degrees F on my oven). If you do not have a baking stone, set an oven rack at the lowest level and place a baking sheet on it to pre-heat.
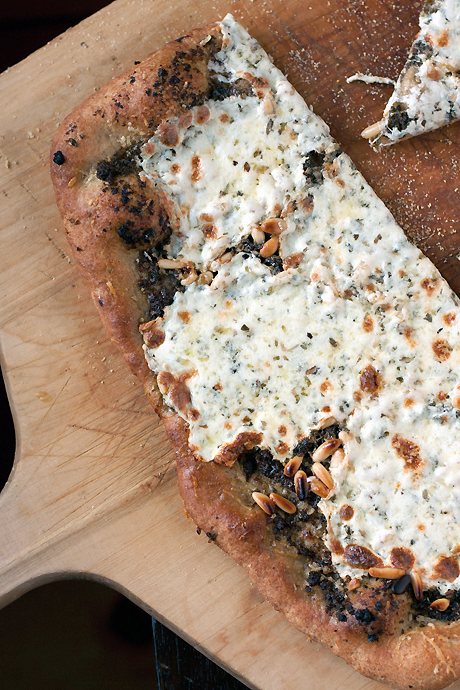
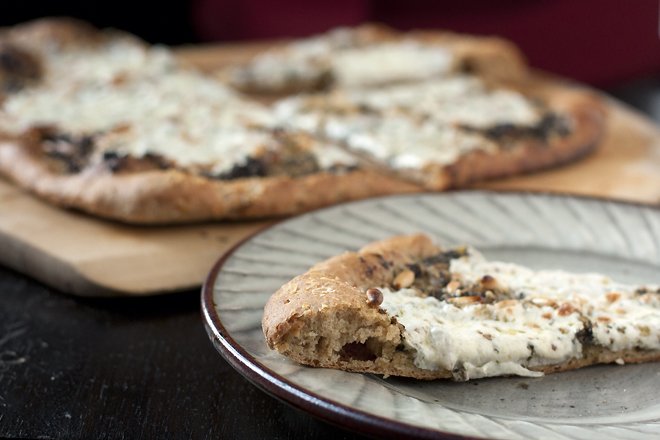
- Shape and cook. Turn the dough out onto a lightly floured work surface. Cover a pizza peel with a piece of parchment, or sprinkle liberally with flour or cornmeal. Cut the dough in half to make two, 12-inch pizza crusts. Pat one half into a rough circle, then, using a combination of light rolling and stretching, shape into a 10 to 12-inch round. This dough will be a little soft and will tear more easily than a traditional, white-flour dough, so use a light touch and try to form the pizza shape with a minimum of handling; the more you manipulate the dough, the stickier it will get and the more difficult it will be to shape. If the middle tears, patch it together and continue shaping. Spread the shaped dough onto the parchment and pile on your favorite toppings. If desired, brush the edges of the dough with olive oil and sprinkle with grated cheese. Slide pizza, on parchment, directly onto a baking stone, or onto the preheated baking sheet. Bake topped pizza for approximately 7 – 9 minutes; par-bake crusts for freezing for 2 – 3 minutes.
Yields enough dough for two, 12-inch pizzas, one 16-inch pizza, two 10-inch calzones, two 9-inch deep-dish pizzas, or one double-crusted, 10-inch stuffed pizza.
 OPTIONS
- Other whole grain flours (spelt, triticale, rye, etc.) can be substituted in part or in whole for the bread & white wheat flour. I generally try to use 2 cups bread flour, for gluten & protein content, plus 1 cup of “other” flour, for flavor and variety.
- If you are used to making pizza dough with regular white all-purpose flour, you may want to use half whole wheat + half AP flour and slowly reduce the amount of white flour as you get used to working with the whole grain dough.
- You can par-bake the pizza crust, then freeze for a quick & easy pizza on a busy weeknight. To par-bake, top the dough with just a bit of olive oil, dried herbs and/or grated hard cheese, slide it, on the parchment, onto your baking stone or sheet and cook for 2-3 minutes. You’ll see the edges puff up and maybe just start to turn color; at that point, remove the pizza crust and allow to cool completely on a wire rack before double-wrapping in plastic wrap and freezing.
STORE
The dough can be punched down four times and refrigerated for up to 36 hours before the yeast is exhausted. Dough can be frozen as well, double-wrapped in plastic wrap, for up to four months, although I find that it is more convenient, and results in better crust, to par-bake the crust and freeze for up to 3 months.
SEASON
Year-round.

We (I) make pizza at least a couple of times a month. Thus far I’ve not made a whole grain crust as I hadn’t found a recipe I felt worth the trouble the recipe inferred. This one I’ll have to try.
You’ll find it frustrating at first: the dough is stickier, takes more work to knead, is harder to shape without tearing. It may take a few attempts, but if you persevere, you’ll find the routine quite similar to working with white flour, yet the flavor so, so much better. Good luck!
Pingback: Two Times Pizza Bianca with Fresh Summer Truffles | Food with a View
I tried and absolutely loved your recipe. Of course I linked to your post in my pizza bianca recipe, hope that’s ok for you. Thanks a lot for the inspiration!
Pingback: 9 Easy Pizza Dough Recipes
We tried this tonight and loved it. I have been experimenting with a few different whole grain pizza dough recipes for the last few weeks. Tonight my husband didn’t even realize it was whole grain until I said something about it. I followed all the steps and found that while it seemed some what intimidating at first it was actually quite simple. Thanks so much for sharing.
You’re very welcome, Ashley! I’m so glad it worked out for you. When I go back and look at it now, I can’t believe how complicated it sounds, when it reality, it is: dump, stir, rest, fold, rest, knead, rise. 🙂 But I do like to keep the detail in there – I think it’s the thing I was missing when I first started making breads.
Pingback: 29 Easy Homemade Pizza [Recipes] | Tip Junkie