
I’ve had a long-running battle with countertop compost bins: too big, too small, too tall, too ugly, hard to wash, heavy to maneuver; it doesn’t seem like it should be this hard, does it? I’ve tried many different approaches, from the classic fireplug version, to a Tupperware bin, an antique pickle crock, a mixing bowl & kitchen towel. They all have their issues.
My biggest issue with most commercial compost bins is the shape: why tall & narrow? It doesn’t make any sense to me. Food scraps get quickly buried at the bottom of the bin, which means that air can’t access the scraps on the bottom and they get very wet and very smelly, very quickly. (Those little carbon-filter pads designed to absorb odors do nothing, in my opinion). Then you need to empty the bin before it’s even full, and scrub out the nastiness before using it again.
My other big issue? Could they be more ugly? Who decided that “fireplug” was the be-all end-all in kitchen compost bin design? Or the ever-popular, “I know! We’ll make it look like a teeny-tiny plastic trash barrel that sits on the counter!” Really, kitchen designers? Really?
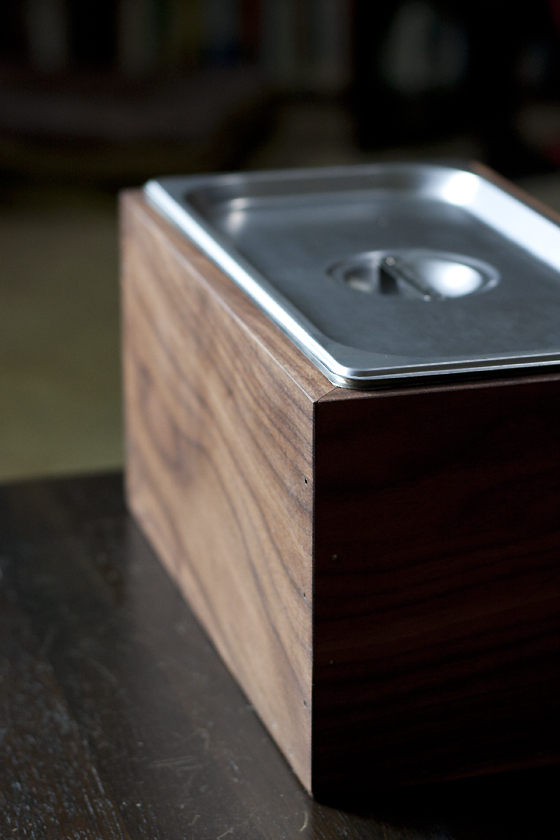
And then I saw the Noaway Bin in food52’s Provisions shop. A beautiful walnut box with a lightweight, stainless steel, long-and-shallow insert to hold the compost. Swoon. The only problem? $129. I don’t think even I could rationalize a $130 compost bin, salvaged walnut or not. I went directly to the source, Cliff Spenser Furniture: nope. Still $129 (as well as the equally lovely Tigger version for $149. Gulp.) So, I drifted away, with a sigh, and continued to use my ugly fireplug bin.
But I couldn’t stop thinking about the Noaway. I kept going back to look at it (maybe it’ll go on sale, she thinks, oh-so-optimistically) and asking Tai things like, “You know those stainless steel pans that they use in salad bars? What are those called?” and, “If I wanted a simple wooden box, say 13″ X 7″ X 6″, could you make one?” And so it came to pass: I found an insert pan of the appropriate size on Amazon (after much searching for “bain-marie” which gave me only sites in Canada & Australia, harrumph), and when Home Depot failed to have any interesting wood, found an online source for pre-cut planks of walnut at Ocooch Hardwoods. We measured and measured and measured again, then Tai borrowed our friend Kathy’s table saw and put his mad woodworking skillz to work, and hey! presto!: DIY walnut countertop compost bin.
 Since, at the end of the day, it was relatively easy to put together (well, especially easy for me, since I didn’t do anything other than order supplies <cough>), I thought I’d share the details here. Keep in mind, this is still a rather extravagant compost bin: the steam table insert ran me about $20 and the wood was $39. However, quite a bit of that was shipping costs: if you have the time and inclination to head to a restaurant supply store for the insert and a lumber yard for some wood, you could bring it in much more economically, I’m sure. What I will say is that is was totally worth the effort of tracking down the supplies and I owe a huge thank you to Handyman Husband Tai for building the box: I love, love, love this compost bin. It sits on the counter looking sleek and lovely, it’s easy to empty and wash, it stays drier and odor-free for longer than my other bins, and it hangs out conveniently right next to the big cutting board on the counter. I thought that the last thing I would want in this kitchen is more(!) wood, but: walnut compost bin, I’m in love.
 MATERIALS
- 1 stainless steel steam table insert pan, third size, with lid
- 2 planks walnut (or other hardwood), ¾” thick X 8″ wide X 24″ long
- finishing nails or wood glue to join corners
- fine-grit sandpaper
- beeswax + walnut oil for finishing rub
TOOLS
- table saw (or a friend with one!)
- someone who actually knows how to use a table saw
- hammer
- tape measure
SPECIFICATIONS
- 2 end pieces, 7 ½” wide at widest point by 6 ¾” tall, with beveled edges at left and right
- 2 side pieces, 13 ½” wide at widest point by 6 ¾” tall, with beveled edges at left and right
- 2 bottom support pieces, 6 ⅜” wide by 2″ long, no beveling (optional)
 METHODS
- Measure your insert bin and determine the optimal size of your box. While the inserts are a standard size, and as such our measurements above should work for you, you should always double-check and trust your own measurements if something seems hinky. Decide if you want bottom support pieces or not. Tai would tell you that they are definitely necessary: I’m not so sure, though my box is quite sturdy. I suspect, based upon measurements, that the Noaway Bin does not have any bottom pieces. If you do not include any bottom pieces, the box walls can be 6″ instead of 6 ¾” tall.
- Cut. Using a table saw, trim the walnut planks to the appropriate sizes and add beveled edges where the box corners will meet. I have never used a table saw; in fact, machine-driven blades of any kind sort of freak me out. So please use all appropriate safety gear and be careful.
- Assemble. Choose the sides with the prettiest wood grain for the outside of the box. Fit the box corners together, including bottom support pieces if using, one in each short end of the box, and join the corners with finishing nails or wood glue.
- Finish. Once the box is fully assembled and dry, lightly sand the exterior for a silky smooth surface. Make a protective rub: melt together ¼ cup beeswax and ¾ cup walnut oil until wax is fully melted. Refrigerate, stirring occasionally, until cooled, about 30 – 60 minutes. Stir briskly to a whip consistency, then rub thickly on the wood surfaces of the box, inside and out. Allow to dry and absorb for at least 2 hours. Rub briskly with a clean cloth. Repeat once or twice a year to keep your wood looking beautiful.
 OPTIONS
- You could probably get away with ½” plank width. Any narrower than that would likely be flimsy and the wood would not show around the edge of the steel insert. We ordered 8″ wide planks to have a little wiggle room: since the box is 6 ¾” tall, you could get away with 7″ planks, or 6″ planks, with no need to trim, if you decide not to include bottom support pieces..
- Obviously, this will work with any hardwood. For an economical option, use hardware store pine and paint or stain the wood to coordinate with your kitchen.
- The nice thing about making it yourself is that you can choose any size steam insert and simply build the box to fit.
Disclosure: There are no affiliate links, nor did anyone pay me to link or say nice things about their product. Links represent the actual products that I used and/or dreamed about.

I’m totally in love with your bin too! And I think it looks even better then the one from Provisions. You should start selling them so I can buy one 🙂
I imagine Cliff Spenser et al would not be very happy about that. Nor, come to think of it, would our friend Kathy when we need to use her table saw every week… Now is the time to befriend someone with 1) a table saw and 2) table saw skillz! 🙂
This is BEAUTIFUL. An arrangement like yours was just struck in our household (I’ll buy, he’ll build) – thank you for the inspiration & for pioneering the project!
Yay! If he has any actual woodworking questions, feel free to post ’em here and I’ll get Tai to answer. Because I would have just cut sorta straight edges with a bow saw and stuck ’em together with gliue! 🙂
Love it!!
What worked for me living in NE Ohio was having a 5 gallon bucket with a couple of quarts of soil and a few worms in it, and putting it in the garage. It never froze, even in winter. The worms ate the garbage and reproduced, and by spring I’d have to empty it into the compost pile and start over because it was quite heavy with worms and worm castings, but no garbage. No smell, no mess, and nothing to empty except for a couple of times a year. It’s cleaner and doesn’t encourage those pesky gnats that come home from the grocery store, or ants, or anything else that crawls or flies.
It’s gorgeous but I have a tiny kitchen with hardly any counter space so tall and narrow is best. Even then, I sometimes end up putting our countertop bin by the door because I need every available inch of counter space. I empty it out daily into our worm farm (down the bottom of the garden, by our vegetable garden) so it doesn’t need to be big or heavy.
The steel inserts come in different sizes all the way down to 1/6, so half the length of the one used here. I settled for 1/4 as it feels better in our kitchen. Thanks to “local kitchen” for the great idea! In Europe the steel inserts are called Gastronorm’s (technically EN-631) and are available in any restaurant supplies shop.
That is gorgeous! I have a garbage-can one we use a lot, but mostly it’s a bowl on the counter. I wish they had hinged lids, so you could throw things in one-handed. But this gives me all sorts of ideas, maybe a larger one for bread!
Give Handyman Hubby Tai two thumbs up! wonderful idea!
I am so glad you persevered! That bin is just stunning and totally worth the effort (and price tag!)
Great idea!
Wow, gorgeous bin! I love it. Those pans are called “hotel pans.” (I work in the restaurant industry).
A few other recommended tools: nail set, 1.5″ finishing nails, wood glue, 90-degree corner clamp, drill, 1/16″ wood bit, extra 1/16″ wood bit (thanks, Kathy!) for when you snap the first one attempting to drill through walnut.
The box would have likely been sturdy enough without the bottom braces, but only because of the nails holding the beveled edges together. Wood glue + finishing nails = pretty sturdy. I just thought it looked nice with the braces. :^)
I didn’t think I needed one, but I see now that I should also build one for my kitchen. Thank you for the tip!! I appreciate it, Gisela
Practical. Attractive design. Great idea!
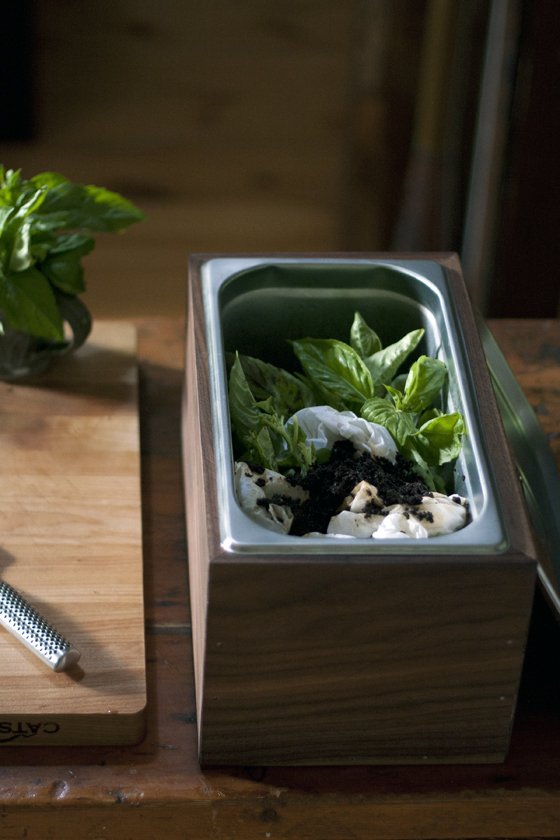
Why so much basil in compost?
The leaves were wilty, so I had put the basil in a bowl of ice water to perk up and use for dinner. Then I forgot about it and it sat in a bowl of water for 2 days. The leaves were quite slimy when I pulled them out… so sadly, then went into the compost.
Nosey me… LOL… You are working with a great lens. Do you mind sharing with “Nosey Me” what lens you are using? Hudson Valley is fortunate to have you blogging about the wonderful food experience available to its residents… and visitors. Love your blog … Thank you.
Thanks so much! I use Canon’s “plastic fantastic” lens: it’s the cheapest lens fixed lens, they make, I think (about $125 these days), the 50mm f/1.8. It has its issues, but really a fabulous lens for the money. http://www.amazon.com/s/ref=nb_sb_ss_i_0_14?url=search-alias%3Daps&field-keywords=canon%20plastic%20fantastic&sprefix=canon+plastic+%2Caps%2C139&rh=i%3Aaps%2Ck%3Acanon%20plastic%20fantastic
Thank you.
Brilliant! I’ll be hitting cash and carry for the insert. ASAP!
Fantastic ! Before this post, I’d never supposed to find any trash bin interesting…
PS – in Italy the name for these stainless bis in “gastronorm”. Don’t know if it’s the standars technical name…
Wonderful! I’m in need of something like this.
Pingback: Outtakes, August 22nd: behind Autumn Makes & Does this week - autumn makes and does
Love finding posts like this that echo the thoughts in my head!
So how does that steamer insert lid do against fruit flies?
To empty, you pop out the insert from the bottom?
Thanks
Hi Jocelyn,
We don’t typically have a big problem with fruit flies here, so I’m not sure I’ve really put the insert to the test. It’s quite good on keeping odors in, though, even when I let it go for a few days.
To empty, I generally grab the edge from the top and pull up, unless it’s really heavy, and then I push it up from the bottom.
ahhh sounds good!
I’m thinking of making one and figuring out an attachment to the wall/backsplash that is easily removable.
thanks again!
This is probably a very dumb question, but this bin does not require worms? Also, how do you collect/what do you do with compost tea?
This is just a countertop collector for kitchen scraps: it needs to be dumped on a regular basis onto a backyard compost pile or tumbler.
Thanks.
Pingback: 20 Best Home Decor Trends for 2017 from Pinterest – Makeup
Pingback: The 7 Best Bins To Buy 2019 Compost Bin Diy | Maine Stones
Pingback: Wood Planks Cut To Size – logcabinphotos.com
Pingback: Wood Planks Home Depot – wood plan