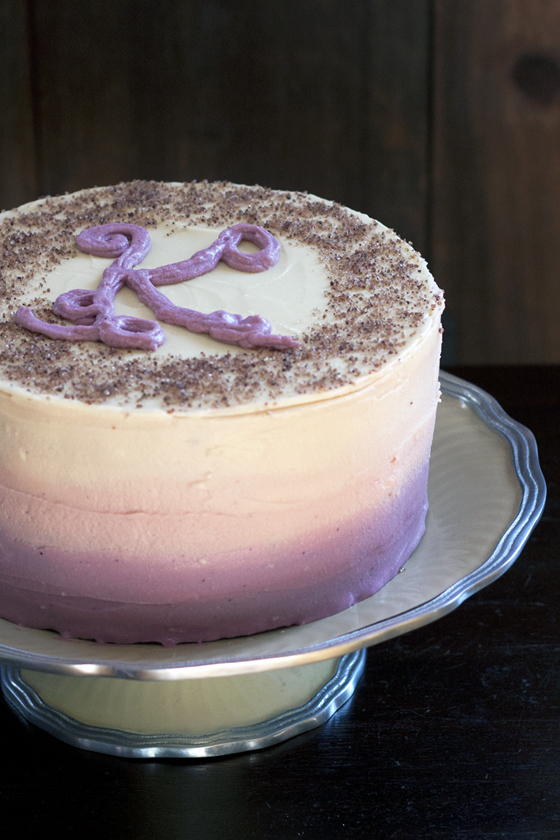
For longer than I’ve been writing this blog, I’ve been making birthday cakes for my friend Kami. There have been successes (a fantastic strawberry-pink yellow cake with a piped frosting garden by Tai the Pastry Chef, a lovely golden orange mousseline cake with royal icing butterflies) and disasters (an attempt at this cake that looked, well, absolutely nothing like that, and the Great Kami Cake Disaster of Aught-Nine); regardless, there has always been fun and laughter, good food and love. And while Kami is 9 years old now, and looking far too grown up for my liking, she’s still kid enough to be delighted with a big, fancy, pink-and-purple birthday cake, from one K to another.
I have to say that the cake recipe is a winner: moist yet fluffy, rich yet not dense, sweet but with just the right amount of bitter coffee edge. Since I ran out of my usual whole wheat pastry flour, I made this one with all-purpose flour, so I will have to try the recipe out again someday with my whole wheat standard. That said, I’m not against all-purpose flour now & again (I just usually don’t have any in the house), when it suits the purpose, and after all: birthday cake isn’t all about healthy grains, it’s about celebration.
I won’t lie: the ombré makes this a bit of a project. Especially if you decide that none of the 300 jars of jam in the pantry are just right, and make another batch of jam especially for the cake. Ahem. But it does make the cake gorgeous and really impressive (honestly, my pictures don’t do it justice, as we were dashing out the door to make it to birthday dinner on time), and what’s a little cake project between friends? Hardly anything at all.
Adapted from Double Chocolate Layer Cake by Gourmet 1999, Simple Vanilla Buttercream by Yossy and Jam + Cream Cheese Frosting by me. Decoration inspiration from I’ll Bake You A Cake by Yossy at Apt 2B Baking Co.
 Kami’s Birthday Cake 2013
INGREDIENTS
Double Chocolate Cake
- 1 cup hot brewed coffee
- 3 oz good quality dark chocolate, broken into pieces (I used Divine 70%)
- 1 lb, 1 and ½ oz (2 and ½ cups) sugar (I used organic evaporated cane juice)
- 11 oz (2 and ½ cups) all-purpose flour (I used King Arthur’s organic unbleached)
- 5 ¼ oz (1 and ½ cups) unsweetened cocoa powder (I used Ghiradelli)
- 2 tsp baking soda
- ¾ tsp baking powder
- 1 and ¼ tsp sea salt
- 3 large eggs
- 2 cups buttermilk, well-shaken
- ¾ cup vegetable oil (I used sunflower)
- ¾ tsp tsp vanilla extract
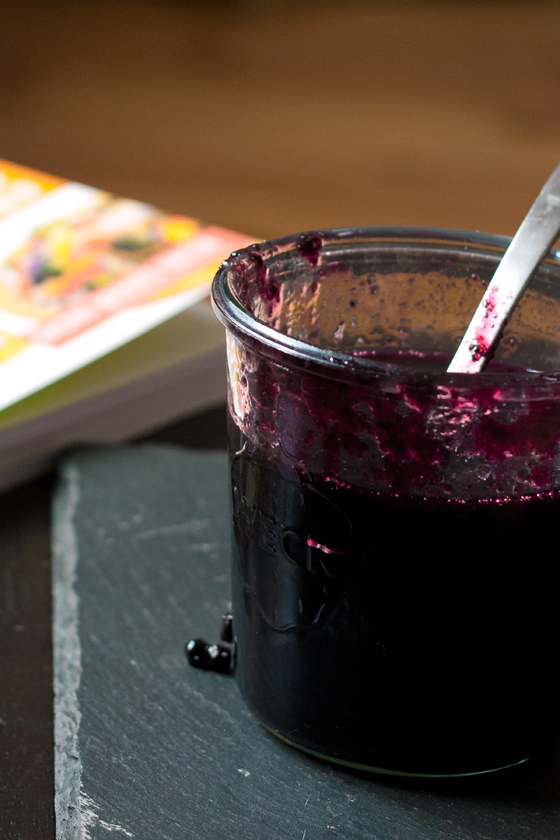
Wild Blueberry Jam (for filling & frosting)
- 1 pint (1 lb) canned, or 1 quart (1 and ¼ lb) fresh, wild blueberries
- 1 and ½ cups (11 oz) sugar (white beet sugar, for purest color)
- 2 tbsp lemon juice
Butter & Cream Cheese Frosting
- 12 oz (3 sticks) butter, softened
- 10 oz cream cheese, softened
- 1 tsp lemon extract
- about 1 and ¼ lbs powdered sugar
- about ¼ cup whole milk or heavy cream
- syrup from wild blueberry jam, for coloring
- colored sugar, for decorating (I used wild blueberry sugar from Spice It Up!, Black Mountain, NC)
 METHODS
Double Chocolate Cake
- Preheat oven to 300°F. Butter two round 8″ X 3″ cake pans, and one 6″ round cake pan. Line bottoms with rounds of parchment paper, then butter the paper. Or use two 10″ X 2″ round pans.
- In a small, heat-proof bowl, combine coffee and chocolate. Let mixture stand, stirring occasionally, until chocolate is melted and mixture is smooth.
- Into a large bowl sift together sugar, flour, cocoa powder, baking soda, baking powder and salt. In a stand mixer, or a large bowl with a hand mixer, beat eggs until thickened slightly and lighter in color, about 5 minutes. Slowly add oil, buttermilk, vanilla, and melted chocolate mixture to eggs, beating until well combined, about 2 minutes. Add flour mixture and beat on medium speed until well combined and aerated, about 3 minutes. Divide batter between pans (2 lbs of batter in each 8″ pan, filling just over halfway, and the remaining 7 oz of batter to the 6″ pan). Bake in middle of oven until a tester inserted in center comes out clean, about 30 minutes for the 6″ pan and 50 – 55 minutes for the 8″ pans.
- Cool layers completely in pans on racks. Run a thin spatula around edges of pans and invert layers onto racks. Carefully remove paper and chill layers in the refrigerator at least 2 hours prior to slicing.
- Using a long, serrated knife, and a cake turntable if you have one, carefully slice each 8″ cake layer in half to produce two 3/4-inch sponge layers.
Yields four 8″ X ¾” sponge layers, and one 6″ X 2″ tasting cake.
 Wild Blueberry Jam (for filling & frosting)
- Combine berries, sugar and lemon juice in a large, wide Dutch oven or preserving pot. If using fresh berries you may want to add up to ¼ cup water to prevent burning. Bring to a boil over high heat, stirring just until sugar melts. Continue to boil hard, without stirring, until mixture reaches the gel point (220 degrees F, or a small dollop winkles on a frozen plate).
- Allow jam to rest in the pot, off heat, for 5 minutes. Using a small strainer and a heat-safe bowl, strain about ½ cup of syrup from about a cup of jam (for use in coloring the frosting). Refrigerate the syrup and jam to stiffen prior to using in the cake.
Yields about 1 pint of jam.
 Butter & Cream Cheese Frosting
- In the bowl of a stand mixer, or in a large, heavy bowl with a hand mixer, combine softened butter, cream cheese and lemon extract. Whip on medium speed, using beater attachment, until creamy, about 2 – 3 minutes. Add sugar, in batches, beating on low speed until sugar is moistened, and salt, then whip on medium-high speed until light & fluffy, about 5 minutes.
- Transfer about one-third of the frosting to a clean bowl (this will be for the colored frosting). Add 2 – 3 tbsp of milk or cream to the remaining frosting in the mixing bowl, and whip until smooth and uniform, about 1 minute. Frosting will be very loose at this point, so refrigerate for at least 30 minutes prior to using.
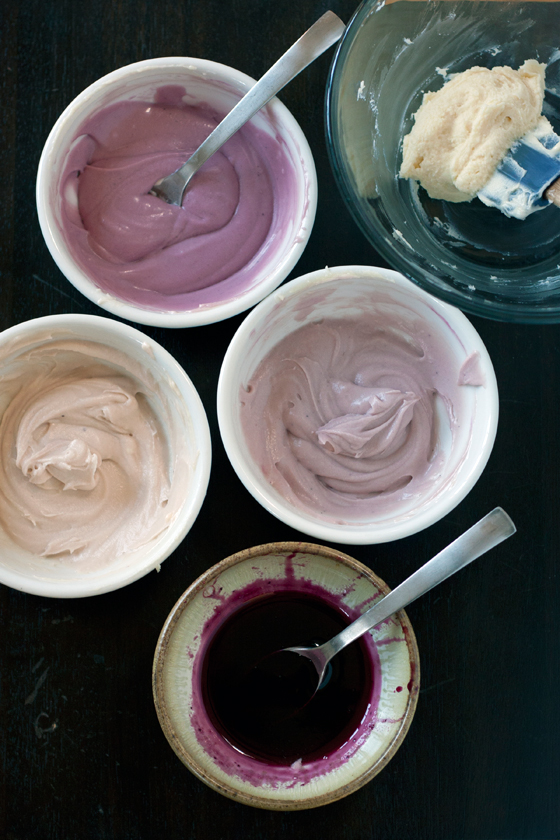
- From the reserved bowl of frosting, portion about ½ cup each into 3 bowls: one for dark, medium and light purple colored frosting. Spoon blueberry syrup into each bowl, mixing frequently, until the desired colors are reached. Remember that the more syrup you add, the looser the final frosting will become. The frosting will be very loose at this point, so refrigerate each of the bowls for at least 30 minutes prior to using. Refrigerate any remaining white frosting for color adjustment and/or frosting the top.
Yields enough frosting for an 8-inch, 4-layer cake.
 Assembly
Check out Yossy’s directions, and Flickr photostream, for more tips on assembly and decoration.
- If you have one, certainly use your cake turntable here. If not, no worries: it can be done, but will just take a bit more time, and careful turning of your cake plate. Cut out an 8-inch circle of cardboard (or use a cake circle) for the base of the cake. This will facilitate transfer of the cake from the turntable to the cake stand once decorated. Anchor the cake circle to the turntable with a little dollop of frosting; anchor the first layer of cake to the circle in the same way.
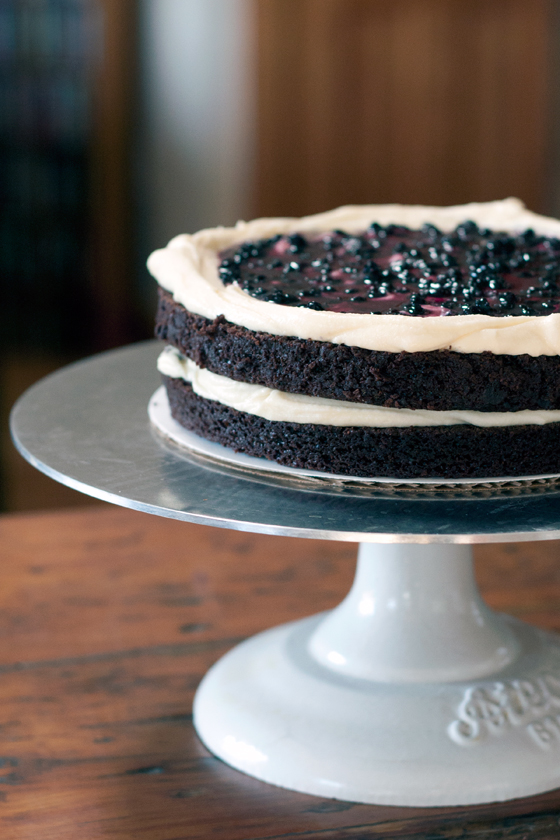
- Using the white frosting in your mixing bowl, dollop a generous ⅓ of a cup frosting onto the middle of the first cake layer. Spread evenly, from the middle, leaving a bit of a dam at the edges, for containing the jam. Drizzle 2 to 3 tablespoons of jam over the frosting; spread evenly over the layer, keeping jam within the frosting “dam.” Top with the next cake layer and repeat the process until you’ve added the top layer.
- Smooth the squished-out edges of frosting along the sides of the cake. Because this cake sponge is so very tender, I recommend chilling the cake in the refrigerator at this point for at least 30 minutes if you have the time, for ease in applying the crumb coat. Taking care not to introduce crumbs into your clean white icing, apply a thin, even crumb coat layer to the top and sides of the cake, making sure the top & sides are level and straight. Chill for at least 30 minutes.
- Frost the cake, starting with the darkest frosting, then the medium, the light purple, then finishing the top with white. Try to smooth each round of color as you go, to minimize adjustments and blending of the color together too much.
- Cut out a 5-inch circle of parchment or wax paper. Use Ruhlman’s trick to make sure it’s even. Lay it over the middle of the cake top, then sprinkle colored sugar all around the rim. Using the darkest frosting and a fine-tip pastry tube, write a message, a design, or a clumsily-executed capital letter for your cake’s recipient. Refrigerate until 1 hour prior to serving.
OPTIONS
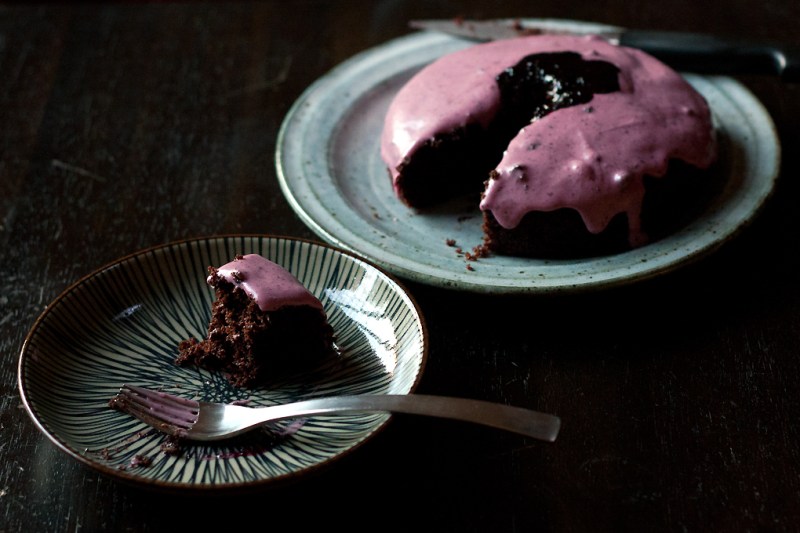
- While I loved the flavor of the wild blueberry-cream cheese frosting, a set of good-quality gel food coloring will make life easier if the ombré look is your goal. Or, I’ve since seen this cupcake recipe: and I even have dried blueberries from last summer on the shelf! Wish I had thought of this, but not sure if it makes the frosting a bit gritty. Will have to test it out.
- If you prefer a sweeter frosting, increased sugar will stiffen the texture (and will only make your life easier if you will be adding jam/syrup). If using food coloring, you can always increase the amount of milk to loosen the frosting if necessary.
- I made a few changes to the double-chocolate cake recipe: reduced the amount of coffee to 1 cup, increased the amount of buttermilk to 2 cups and reduced the amount of sugar by ½ a cup. I was happy with all of the changes.
- I wanted a smaller-but-taller cake, so instead of the two 10″ cake pans called for in the Gourmet recipe, I used 8″ X 3″ pans to yield 4 layers. With the excess batter, I made a tiny, 6″ test cake.
STORE
Frosted & assembled cake keeps well, refrigerated, for up to 1 week (cut edges will start to dry out after a few days). Unfrosted cake layers will keep, well-wrapped, for 1 week refrigerated or up to 6 months frozen.
SEASON
Spring!

The ombré cake looks amazing! Love the purple coloring!
I love ombré cakes. I’m actually planning to have for my wedding. Beautiful work.
I – the ex-professional pastry chef – had absolutely nothing do to with this cake. K did everything, including the fabulous decoration. And it tasted amazing!
This looks overwhelmingly delicious! Would be great to hear later about your experience with whole meal in this recipe.
There are so many fine pastry recipes in the blogosphere but many of them without “normal” meal. I always try to turn these recipes into whole meal versions (I am not ideologic in that, I just like it better for health and in taste alike) but often have some difficulties with the right proportions. I’m therefore thrilled to read that this is your pastry standard – I will definitely do some cake & co. research on your blog :-).
Happy birthday to little Kami!
Hi Claudia,
I typically use a mix of whole wheat pastry flour + corn starch to lighten it up a bit. It definitely does not rise as much as AP or cake flour (so if you are looking for a fluffy cake texture, you may need to consider incorporating egg whites or another leavener if you want to work with whole grains), but it certainly is not “dense.” My standard chocolate cake formula is here: https://localkitchenblog.com/2009/07/23/battle-of-the-cake-flour-substitutes/
For everyday cakes and quickbreads, I’ll often use a mix of WW pastry and whole white wheat (what my farm calls “whole wheat AP”). Hard red wheat (bread flour) I typically save for bread, pizza dough and things that need high gluten.
Translating ‘regular’ cake recipes to whole grain flours can be a bit finicky, as they often need more or less liquid than called for with predictable AP flour: sometimes what I will do, if I really want to get it perfect, is make a half batch (single layer) with AP flour to see what the texture of the batter should look like, then make again with WW pastry and adjust to that texture. But mostly: I just wing it. 🙂
Hope that helps!
Kaela
Thank you so much, Kalea! So much fine input and hints, you made my day. I will try out your standard chocolate cake soon and will let you know how it worked, I guess just perfectly (this will also be a wonderfull opportunity to try something else with my raw cocoa beans after I made some raw truffles with it the other day which I will post soon). Unfortunately, Berlin/Germany doesn’t seem to be the best place to get all those different whole wheat flour types that you mentioned, at least not in normal organic shops. But I will watch out for some local mill – I would very much like to find such an AP whole grain flour.
Thank you very, very much again for your help!
Best, Claudia
I think this beautiful cake may be a bit of a stretch for my baking skills, but I could reach right into those photos and try to take a bite! Absolutely exquisite. Maybe I can find a way to ask one of my special friends to bake this for me for MY birthday! 🙂 Yum!
Reblogged this on Lizza Summer and commented:
Add your thoughts here… (optional)
Holy amazing looking cake! I’m getting married in a little over a month, and if my cake tastes half as good as that one looks, I’ll be THRILLED! 🙂
Congratulations! Best wishes for an over-the-top-fabulous wedding cake! 🙂
Pingback: Bryllupskake | Cupcakes | Cakepops | Weddingcake | Norwegian Wedding Blog